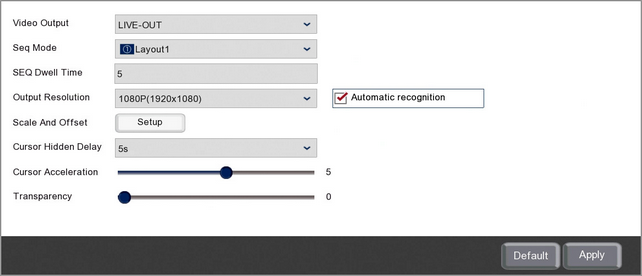
Selecting LIVE-OUT from the Video Output drop down list in the General Output sub-menu allows you to configure the display of the recorders live view for the HDMI and VGA outputs.
As this is the main output of the recorder this will also display the menu system and the mouse cursor.

You can configure the following the settings for the recorder's live view display.
Setting The Live View Auto Switch Layout
The camera layout which is displayed when you select Auto Switch in the Live View menu can be set in the Seq Mode drop down list. You can select a single channel display or one of the various multi-channel displays from the drop down list.
Setting The Auto Switch Timing
You can choose the amount of time the recorder displays the Auto Switch layout before moving on to the next camera or group of cameras in the SEQ Dwell Time field. This is a free text field where you can specify in seconds how long the recorder should display each layout.
Choosing The Recorder's Output Resolution
You can choose the resolution used for the HDMI and VGA outputs from the Output Resolution drop down list.
The recorder supports up to a 4K output which can be displayed over HDMI or you can display up to 1080P over VGA and HDMI. Alternatively you can click the Automatic Recognition check box and the recorder will set itself to the maximum resolution supported by your monitor.
Changing The Screen Size And Position
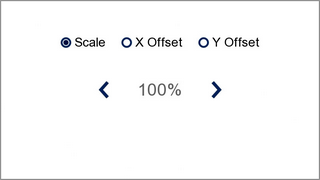
Clicking the Scale And Offset Setup button will display the image scale and offset controls so that you can adjust the size and position of the recorders display on your monitor. A red rectangle shows the edges of the display so you can ensure that this is within the monitor's screen.

To adjust the Scale (size of display), X Offset (left and right position), Y Offset (up and down position) select the corresponding radio button and use the left and right arrows. To adjust the X or Y offset the scale must be below 100%.
Setting When The Mouse Cursor Disappears
The Cursor Hidden Display drop down list allows you to set how long the mouse cursor remains visible on-screen after you last moved the mouse. This can be set from 1 second up to 2 minutes. Once you move your mouse again the cursor will reappear.
If you want the mouse cursor to remain on-screen at all times you can select Off from the drop down list.
Adjusting The Speed Of The Mouse Cursor
You can set the mouse speed from 0 to 9 using the Cursor Acceleration slider. This controls how fast the mouse moves around the screen and you may wish to change it depending on the output resolution of the recorder. On a high resolution a fast mouse speed may help so it doesn't take too long to move around. Where as on a low resolution a slow mouse speed will stop the cursor zipping around making it difficult to control.
Setting The Transparency Of Menus
The Transparency slider sets the opacity of the live view and main menu system. The slider can be set from 0 to 128 with 0 being no transparency and 128 being 50% transparency.