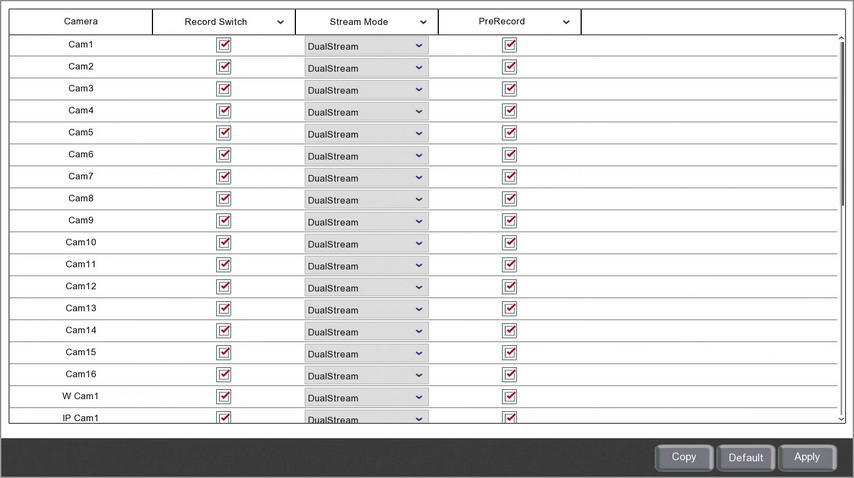
In the Record sub-menu you can set which channels and which streams are recorded. Once you have chosen which channels to record you can set up a Recording Schedule to specify what to record for each channel and when.
The settings available will differ depending on recorder, camera type and camera model.

Camera
Lists all channels on the recorder.
Enabling And Disabling Recording
You can enable or disable recording for each channel individually by ticking or unticking the Record Switch check box.
Please note that this only tells the recorder that these channels are OK to record footage. You still need to create a Record Schedule to tell the recorder when to record footage. Without a Record Schedule the recorder won't record any footage.
Choosing Which Stream To Record
You can select which stream to record for each camera from the Stream Mode drop down list.
DualStream will record both the high quality mainstream and the lower quality substream. This is handy if you plan to playback footage remotely over the internet via the Zip Vision PC client software or mobile app. When playing back footage you can select the less demanding substream for smooth playback on slower internet connections.
Mainstream will only record the high quality mainstream. If you don't intend on playing footage back remotely then a recording of the lower quality substream is not required. By recording the mainstream only you can save on disk space which would usually be taken up by the substream.
Enabling Pre-recording
Some features on the recorder such as motion detection allow you to specify a pre-record time. This is an amount of time the recorder will capture footage for before an event trigger occurred. For example, if you set a motion detection pre-record time of 30 seconds and motion detection is triggered, the recorder will capture the motion trigger plus the 30 seconds before the trigger so you can see the build up to the event.
You can enable or disable pre-recording by ticking or unticking the PreRecord check box.
Copying Record Settings From One Camera To Another
Rather than re-entering the same settings for each camera you can copy settings from one camera to another by clicking the Copy button. For more information on copying settings see the Parameter Copy section.
Defaulting Settings
You can restore settings back to their default value by clicking the Default button.
Saving Changes
Once you are happy with your settings click the Apply button to save them. Alternatively you can right click with the mouse to exit the Mainstream menu without saving changes.