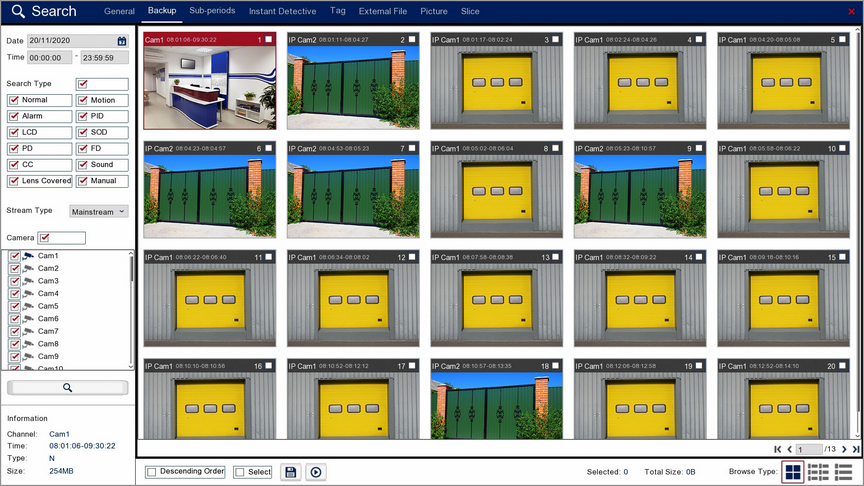
The Backup screen is where you can export recorded footage to a USB storage device. You can use the panel on the left hand side of the screen to search for footage by date, time, type and camera as explained below.
Date & Time
When you open the Backup screen it will automatically start on the current day with the time set from 00:00 to 23:59 to cover the full days recordings.

To view footage from a different day click the Calender icon to display the calender screen as shown below.
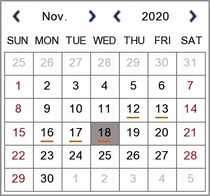
You can change month and year using the blue arrows then select a date by clicking on it. An orange line underneath a date indicates that footage was captured on that day.
Search Type
Choosing the Search Type allows you to filter which footage is replayed based on what triggered the recording in the first place. For example, if you only select Alarm you will only see footage which was recorded because of an alarm trigger. By default all search types are selected. You can select any combination of search types or you can tick and untick the box next to Search Type to select or deselect all search types.
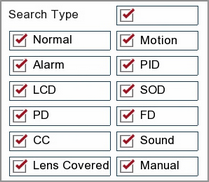
Normal: Shows all footage recorded from constant recording or normal Scheduled Recordings.
Motion: Only shows footage which was captured from Motion Detection.
Alarm: Only shows footage which was captured as the result of an Alarm Trigger.
PID: Only shows footage which was captured as the result of a PID (Perimeter Intrusion Detection) trigger.
LCD: Only shows footage which was captured as the result of a LCD (Line Crossing Detection) trigger.
SOD: Only shows footage which was captured as the result of a SOD (Stationary Object Detection) trigger.
PD: Only shows footage which was captured as the result of a PD (Pedestrian Detection) trigger.
FD: Only shows footage which was captured as the result of a FD (Face Detection) trigger.
CC: Only shows footage which was captured as the result of a CC (Cross Counting) trigger.
Sound: Only shows footage which was captured as the result of a Sound Detection trigger.
Manual: Only shows footage which was captured manually by pressing or clicking record.
Stream Type
The Stream Type drop down list allows you to filter between Mainstream and Substream recordings.
![]()
Camera Selection
By ticking and unticking the check boxes next to the cameras you can set which cameras are displayed during playback. Cameras which didn't record footage on the selected date will be greyed out and unavailable for selection. You can select any combination of cameras or you can tick and untick the box next to Cameras to select or deselect all cameras.
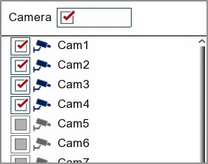
Once you are ready click the Search button to display all recordings which match your chosen parameters.
![]()
Selecting Footage
Recordings are split into segments so that you can backup portions of the day covering the events you need rather than having to backup the entire day.
In the header of each segment's thumbnail you will see the name of the camera the footage was captured from as well as the time period the segment covers.
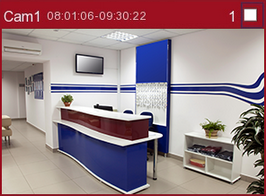
To select a recording segment just tick the box in the top right corner. You can select multiple recording segments and back them up at the same time.
When a large number of recordings are found they will appear over multiple pages. To switch between pages use the control arrows in the bottom right corner.
![]()
Segment Information
The information pane in the bottom left corner of the screen shows the channel the recording was captured from, the start and end time of the recording, the recording trigger and the file size of the recording.
Backup Toolbar Explained
There is also a toolbar at the bottom of the screen to help with your selection as explained below.
![]()
Icon |
Name |
Function |
|---|---|---|
|
Descending Order |
By default the recording segments are in order from oldest to newest. To view the newest recording first tick the check box next to Descending Order. |
|
Select |
You can select and de-select all recording segments by ticking or unticking the Select check box. |
|
Save |
Click Save when you are ready to backup. You will be given a choice of 3 file formats. |
|
Play |
Click Play to view the Backup Preview screen where you can view footage before backing up. |
|
Selected |
Shows the number of recording segments selected. |
|
Total Size |
Shows the total file size of all selected recording segments. |
|
Thumbnail View |
Displays recordings as thumbnail images with camera name, start and end time. |
|
List View |
Displays recordings in a simple list view showing camera name and start time. |
|
Detailed List View |
Displays recordings in a detailed list view showing camera name, recording type, date, start time, end time, file size, quick playback and lock. |
![]() Saving Footage
Saving Footage
When you are ready to backup your footage click the Save button on the toolbar. The following window will be displayed showing the total file size of all the footage being backed up.
You also have 3 options for the file format. Qzip is secure, encrypted file format which can only be played back using Zippy player which can be downloaded from SoftCCTV.com. You can also save the clipping as an AVI or MP4 video file which can be viewed on most media devices.
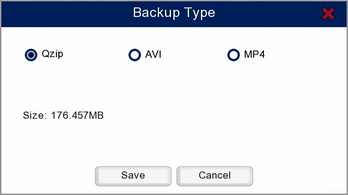
When you have made your selection click Save. A Backup window will display where you can choose and manage you backup device. For more information see the Backup section.
![]() Locking Footage
Locking Footage
You can Lock footage so that it is not overwritten keeping it safe for backup or playback at a later date. To do this enter the Backup screen then can then click the Detailed List View icon as described above. Each recording has a unlocked padlock icon at the end of the line listing. Simply click the unlocked padlock icon to lock the footage. The icon will then change to a locked padlock to show the footage is now locked.