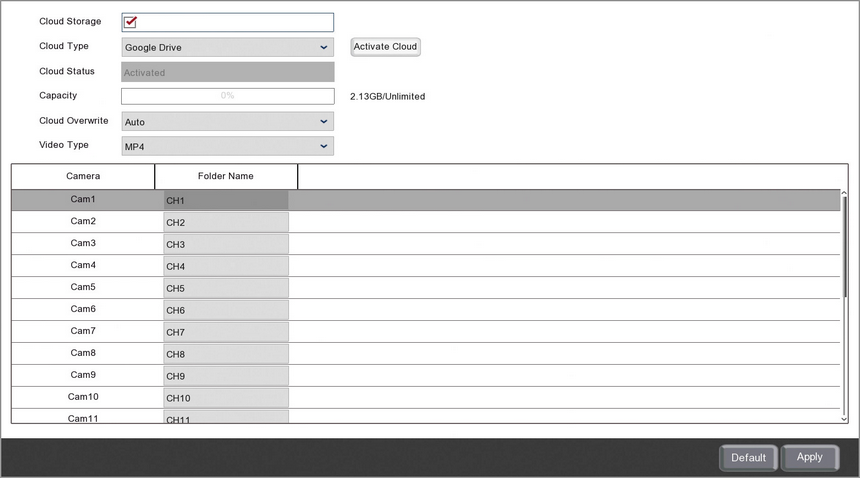
The Cloud sub-menu allows you to link your Zip recorder to a cloud storage service and automatically upload videos and snapshots captured by a motion detection trigger, an alarm input or through one of the Smart detection features. You can link your Zip recorder to either a Dropbox or a Google Drive account.
The cloud storage services supported may differ depending on the model of recorder.

How Set Up Cloud Storage
Before setting up cloud storage you must have emails set up as the recorder will attempt to send an activation link. The activation link will be sent to the email address in the Receiver 1 field so the cloud storage account must be one this recipient has access to.
One you have emails configured you can link your Zip recorder to your cloud storage by following these simple steps:
1.Tick the Cloud Storage check box to enable the cloud storage feature.
2.Select the cloud service you want to link to from the Cloud Type drop down list.
3.Click the Activate Cloud button to send an email containing the activation link.
Choosing What Is Uploaded
You can upload snapshots or video for each camera from a motion trigger, an alarm trigger or a smart detection trigger.
To do this you need to enable Picture To Cloud and/or Video To Cloud in the Alarm menu under the Motion sub-menu, the I/O sub-menu and/or the required smart detection feature in the Smart sub-menu.
When you have set what you want to upload don't forget to check that motion detection or the smart detection feature itself is actually enabled. You can do this in the Video menu under the Motion sub-menu and the Smart sub-menu by ticking the Switch check box.
Enabling And Disabling Cloud Storage
Once you have set up cloud storage you can enable and disable cloud storage uploads as and when required by ticking or unticking the Cloud Storage check box.
Capacity
This shows how much of your cloud storage space is being used and you total cloud storage space available.
Overwriting Old Footage
You can decide if and when old footage is overwritten from the Cloud Overwrite drop down list.
Auto
When set to Auto this will automatically overwrite old recordings with new ones when your cloud storage is full. This process will always overwrite the oldest footage first.
OFF
You can turn overwriting OFF so that when your cloud storage is full it will stop saving footage.
Specified Number Of Days
You also have the option to start overwriting old footage after a set amount of days. You can choose from 1 day up to 90 days. This is a great way to comply with GDPR as it will always overwrtie the oldest footage first so you can confidently state "We only store footage for X days".
Selecting A Video Format
You can choose the video format of footage saved to the cloud from the Video Type drop-down list.
QZIP
This is a secure, encrypted video format which is great for CCTV footage as it can only be viewed using the Zippy player
AVI
A high compression video format which will save a storage space but may lose image quality.
MP4
The most supported video format which can be played back on most devices.
File Structure & Naming Folders
When saving footage to your cloud storage you will notice that a folder is created automatically for the recorder which starts with the recorder's device name and ends with the recorders MAC address. Inside the recorder's folder you will find a folder for each days footage named in a year, month and date format (YYYYMMDD). Finally inside each day's folder you will find a folder for each cameras which has uploaded footage or snapshots.
To make things easier you can give each camera's folder a memorable name so they are easier to find such as "Car Park" or "Reception". To do this just enter the name you want to use into the Folder Name field next to the corresponding camera in the Cloud sub-menu.
Once set every time footage or snapshots are uploaded for the camera they will be placed into a folder with the given name.
Defaulting Settings
To restore settings back to the factory default you can click the Default button.
Saving Changes
When you are happy with the current settings click the Apply button. If you exit the window without saving any changes will be lost.