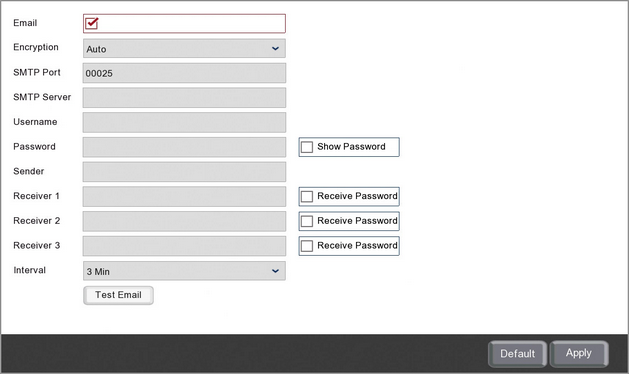
If you want to receive email notifications from the recorder you have to configure your email settings in the Email sub-menu.
It is also a good idea to configure your email settings as a fail safe as this allows you to send a new admin password if you ever forget the recorder's log on credentials.
Once you have set up email notifications you will need to create an Email Schedule to tell the recorder when to send emails and what to include.

The email settings will differ depending on the domain of email address you want to send the notifications from. You may have to check online for the settings of the domain you intend to use.
Tip 460 shows you how to set up email notifications for a Gmail or a Yahoo email address.
Enabling Email Notifications
You can enable or disable email notifications by ticking or unticking the Email check box.
Encryption
This can usually be left as Auto but you can choose TLS, SSL or Disable encryption if required from the drop down list.
SMTP Port
The default SMTP port is 25. In most cases this should be OK but you may need to change this depending on the encryption type or SMTP server you are using.
SMTP Server
The SMTP Server needs to match the domain of the email address you want to send the notification emails from. For example if you wanted to send notification emails from alerts@yahoo.com you would need to use the Yahoo SMTP server.
Username
The Username is the email address you want to send the email notifications from.
Password
This needs to be the one time use authentication password for you email account.
You will need to go into the security settings of the email account you have set as the Username above. From there you can generate an app password. In the app list choose Other, enter a memorable name like "Zip Recorder" then click Generate. This will produce your one time use authentication password.
Sender
This is the name which will appear in the From field on the email notifications. You could simply re-enter the email address you are sending the notifications from or enter something more recognisable like "Office Recorder".
Receiver
You can enter up to 3 email addresses you want to send email notifications to.
Password Recovery
A major benefit of having email settings configured is the ability to send a new admin password if you ever forget the recorder's log-on details.
By ticking or unticking the Receive Password check box you can decide which email addresses will receive the new admin password when it is sent.
Interval
You can set how often the recorder sends email notifications from the Interval drop down list. The interval can be set from 1 minute up to 10 minutes.
The recorder will only send notification emails when there is something to report. Setting an interval allows you to limit how many emails you receive as notifications will be compiled and sent together.
Test Email
Once you have entered all of you email settings you can send a test email to check everything is working correctly by clicking the Test Email button.
Defaulting Settings
To restore settings back to the factory default you can click the Default button.
Saving Changes
When you are happy with the current settings click the Apply button. If you exit the window without saving any changes will be lost.